DuckpinV001
Project Documentation
This project is maintained by cliffeby
Duckpins -Project Documentation
About Me
I am a retired civil engineer studying software development as an avocation. I’ve found the software development “community” unparallelled in support for all levels of users. When you hit a roadblock, video tutorials, blogs, Stack Overflow, etc. provide a wealth of content. For me, a quick search, a ctrl-c/ctrl-v and my problem is solved. No other profession offers more to it colleagues. However getting past the HW or sample app has often been a struggle for me. As I navigate that world with my Duckpins and Roch app, I will document some of the “not so sample” issues and questions that arise.
This GitHub page is one of several blogs on my efforts to get beyond HW. I expect that the document and other blogs will be updated as I learn more about the Azure, VMs, Python and OpenCV. I also post at DEV
Cliff Eby - October 2018
UPDATE December 2018 - A second blog is avalable at Duckpin Phase II. It describes the use of Azure Machine Learning Studio and Jupyter Notebooks for analytics and other improvements to the project.
UPDATE January 2020 - A third blog is avalable at Duckpin Phase III. It is strictly data analysis and analyzes over 10,000 rolls.
Preamble
As a hobbyist with a life-long interest in what makes things work, I look for projects that are more than demonstrations of “cool” technology. For years, I wanted an Arduino or Raspberry Pi (RPI) but avoided the “technical investment” because I wanted to do more than turn on LEDs. Similarly, with IOT I wanted to stream and store more than local weather data.
Project Introduction
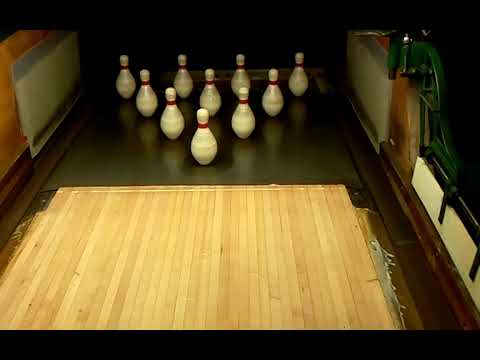
The pinsetters at Congressional Country Club were designed well before the first integrated circuit was demonstrated. They are controlled by mechanical relays in a Gold-Ruberg artform. When I bring guests to the Club, the pinsetters are a must stop and I can spend at least 15 minutes watching them perform. (See Appendix D) Each lane headboard shown below has a display of pin numbers, but they are not and were never functional. Could I use a computer to light the numbers? Could I track the ball’s location, angle, and speed and measure the result? Did I find a use for a RPI and IOT in one project? And, could I do it all for less than $100 per lane?


Background
Duckpins
Regular duckpin bowling is popular in the northeastern and mid-Atlantic United States. It is a variation of 10-pin bowling. The balls used in duckpin bowling are 4 3⁄4” to 5” in diameter (which is slightly larger than a softball), weigh 3 lbs, 6-12 oz each, and lack finger holes. They are thus significantly smaller than those used in ten-pin bowling but are slightly larger and heavier than those used in candlepin bowling. The pins, while arranged in a triangular fashion identical to that used in ten-pin bowling, are shorter, smaller, and lighter than their ten-pin equivalents, which makes it more difficult to achieve a strike. For this reason (and like candlepin bowling), the bowler is allowed three rolls per frame (as opposed to the two rolls per frame in ten-pin bowling).
The Sherman automatic pinsetter was developed in 1953 and the company ceased operation in 1973. Existing operators are forced to cannibalize pinsetter parts from the bowling houses that close, often buying the machines and putting them into storage to use for spare parts. The lack of new pinsetters is a significant cause of the decline of duckpin bowling.
CCC Duckpins
There are four clubs in the Washington-Metro area that have duckpin facilities on the premises – Congressional, Chevy Chase, Kenwood, and Columbia. Congressional’ s pinsetters were installed in 1961 and have been maintained by Ken Palmer , its bowling professional, for the past 30 years. His experience and a good inventory of spare parts is the key to its continued reliable operation. CCC does not have an auto-scorekeeper. Prior to 1961, the pins were manually reset by golf caddies. At CCC, duckpin bowling is a winter sport.
Player/User Requests
In addition to lighting the Lucite numbers, there was a request to indicate the number of balls used during each frame. If the ball can be reliably detected, a seven-segment LED display can be controlled by the RPI to indicate state.
User interest or requirements for the ball-pin interaction data is not known. There is no known Moneyball analysis of duckpins. It is hoped that a university may have interest in the one-of-a-kind dataset. If this data can be captured, JSON or CSV table format stored in the Cloud is likely a good starting point.
Spoiler alert- The RPI can not reliably detect a ball in multiple frames and often misses gutter balls. It can capture and send a video file with multiple ball frames for post-processing. For the ball counter, a laser tripwire was being investigated, but unreliable.
Tools
Hardware
- Raspberry Pi Model 3 B ARMv7.1 with 1G RAM 32G MicroSD - $35
- Camera Video Module 5MP Webcam 1080p 720p $14
- 12v 30a Dc Universal Regulated Switching Power Supply 360w
- LED bulbs and sockets
- Five-watt equivalent, LED T10 wedge bulbs and connectors
- DWVO Superbright 1156 LED Light Bulb
- 1156 BA15s LED Light Bulb Socket Holder
- SainSmart 8 and 4-Channel Relay Modules
- 5” 7-segment LED for ball counts 230 ohm resistors
Software
- Raspbian GNU/Linux 8 (Jessie)
- Python 3.4.2
- Node v9.4.0
- VS Code – Code-OSS Version 1.14.0
- OpenCV 3.4.0 – Open Computer Vision
- Xrdp Version 0.6.1 – Remote Desktop Protocol Server
- TightVNC 1.3.9
- Azure-IOT-SDK-Python 2017- GitHub Branch lts_07_2017
- Package Managers
- apt-get 1.0.9.8.4
- Yarn 1.5.1
- NPM 5.6.0
- PIP 9.0.1 and later upgraded to 18.0
- Linux raspberrypi 4.9.76-v7+
- Repository
- Development
- Git and GitHub – repos at https://github.com/cliffeby/duckpin2
- Production
- TBD
- Development
The RPI image
Setting up my image on the RPI takes about four hours. OpenCV, IOTHub, and VSCode are large installs and sometimes need a second try. It’s generally best to minimize memory usage (close other windows and multitask on another computer). Once completed, back it up – another lengthy process – but well worth it. I cracked my SD Card (make sure that you take the card out of its slot before installing or removing the RPI in a case) and a backup would have saved a lot of time.
I try to keep my image up to date using command $ sudo apt-get update && sudo apt-get upgrade -y.
Appendix A contains hints on the image setup and issues that I encountered.
Where to start?
Several online video tutorials show an RPI with a standard 1080p camera module able to achieve multiple (maybe over 40) frames per second video processing throughput. Relays connected to the GPIO pins should be able to switch/light 10 led bulbs using an external 12vdc power supply. Azure and AWS have RPI SDKs. It seems like all the pieces are there, but can it all come together to be more than a “classroom” or “demo” project.
RPIs use a Linux variant, Debian, operating system. As a DOS/Windows guy, it would offer some challenges, but nothing a search couldn’t solve. Most RPI video processing is done with Open Computer Vision (OpenCV) which has Python and C++ SDKs. With no background in either language, I investigated C++ because it was reported to be faster. After a couple of tries, I moved to Python because:
- it felt more like JavaScript or the Fortran that I had once used
- it had many more tutorials
- the OpenCV and other Python imports are C++ wrapped and I wouldn’t be losing a lot of processing speed.
On a RPI, typically two major Python versions are installed. I stuck with Version 3 and at the time of this writing it was Python V 3.4.2 ($ python3 –v). I found Python 2 examples often needed some syntax changes to pass the Python3 interpreter.
The RPI is an amazing piece of hardware for $35, but I prefer to use my desktop for coding and research. When I loaded Python to my desktop, I installed Python version 3.6.2. It installed to Programs\Python\Python36-32 and was added to the path so that the >python starts the Python3 interpreter. I did not have issues with portability between the two Python3 versions.
Python syntax was a little new (see Wikipedia page and this online book for a good language summary). My first programs were to understand the control/looping syntax and data structures - dictionaries, lists, generators, and tuples. The default IDE on the RPI is IDLE but it is short on features. I tried installations of Webstorm and Visual Studio Code and settled on VSCode despite the previously referenced error on an RPI. Also, VSCode consumes considerably more resources than IDLE, so IDLE was often used when only minor changes were expected.
OpenCV was next and early efforts were to grab a frame from a video stream, analyze it, and save it to a file. Some tutorials offered a video file for experimentation, so I started with my desktop development instance and moved to the RPI piCamera after some experimentation. Recognizing that I would not want to do most of development sitting next to the pinsetter, I used the camera to capture representative video for subsequent development. But this created two code bases, one with video from a file and a second with video streamed from the camera.
Equally difficult for me was version control and keeping everything synched. Discipline with git and GitHub was always lacking but I tried to make it work. With three local repos (desktop, RPI at the lane, and RPI at home) and the GitHub remote, I used Appendix B to keep synched.
Along the way, I added the ability to use Remote Desktop and SSH from my desktop to use the RPI or access the RPI’s SDCard storage. The only drawback is that neither remote process provides direct camera images on the remote desktop. As shown here, OpenCV, using Remote Desktop and the waitKey command to break the loop, will generate an image on the remote.
import cv2
img=cv2.imread('C:/Python/03323_HD.jpg')
cv2.imshow('Window',img)
cv2.waitKey(0)
cv2.destroyAllWindows()
Since my final installation was expected to be an RPI without a monitor or input devices, I needed to learn remoting resources and limitations. Argv from the import sys was one of those concepts. It allows you to pass parameters from a command line execution. Again, lots of online tutorials on this.
Next was the use of GPIO pins on the RPI. I started with the obligatory single blinking led on a breadboard powered by the RPI and quickly moved on connecting the GPIO pins to SainSmart 8 and 4-Channel Relay Modules. Like my learning Python syntax and OpenCV, I created some simple programs to get feedback.
Finally, I turned to IoT to send and store data. I started with AWS and struggled to load the Python instance on the RPI. I can’t recall the installation issue, but once installed I simply could not set the required credentials. Naming conventions in the tutorials seemed inconsistent, even with my background in writing several AWS lambda functions. After many hours, I turned to Azure IoT for Python and it just worked. I had a sample IoT client sending data to Azure and storing it in Blob Storage in less than an hour.
So far, so good. On to the design process.
Hardware Design
I made a 4 x 6 x 12” wooden channel to mount the RPI, camera and relay modules (Figure 2). Restrictions were:
- Access to the RPI’s HDMI, USB, power, and GPIO connections
- RPI – piCamera: Standard piCamera ribbon cable is six inches and the piCamera also needs a mount.
- RPI – relays: Standard GPIO female to female pin connectors are six inches.
- Since I had no idea where the optimum location or angle for the camera was, I first choose a tripod for the piCamera mount. After some experimentation, a 24” ribbon cable and an angled camera mount allowed me to permanently fix the piCamera on the wood channel.
- I wanted space for the power supply to keep everything portable.
Reflectors for the bulbs to light the Lucite numbers were long since destroyed and unavailable. Using a 4” and 2 3/8” hole saw, I created ¼” plywood flanges and cut the tops off 12oz. soda cans for the reflectors. A washer was epoxied to the back of the can to accept the bulb holder.
Two led bulb forms were considered. A five-watt equivalent, LED T10 wedge bulbs and connectors were inexpensive and produced subtle light. The 15-watt equivalent, LED 1156 base, also inexpensive, but was overpowering and washed out the Lucite number. Both bulbs offered various colors if desired. Beware, led bulbs have polarity, and the T10 wedge is interchangeable. No harm if in backwards, it just doesn’t light.
Last, a 12-pin connector was considered for ease in removing the RPI and relays from the 10 led bulbs. Making the 20+ crimps seemed tedious and use of the connector remains on the TODO list.

Software Design
Duckpin bowling is unique in that the player is allowed three balls in each frame to knock down the 10 pins. Unlike 10-pin bowling where the pinsetter is automatic after each thrown ball, duckpins requires the user to clear any deadwood that may remain on the alley. Clearing deadwood is optional as it is often not needed. Also, manually initiated in duckpins is the reset for all 10 pins.
The headboard that displays the Lucite pin numbers is about six feet from pin #1 and the camera is mounted on its back facing the pins. It is a perfect location to view the deadwood and reset arm, the pinsetter motion, the ball before hitting the pins, and the pins that remain standing.
In general, the software needs to recognize several states, capture results, light the led bulbs, and send IoT messages.
| State | Action |
|---|---|
| Ball has entered the field of view | Save video, capture location and repeat until absent |
| Deadwood or reset active | Stop pin and ball capture |
| None of the above | Check for pins standing; light led bulbs |
| Pins stopped falling | Record pin configuration |
| Data package ready | Send IoT data to Cloud |
OpenCV typically uses a mask approach to detect motion or changes between two frames of video. The first frame is subtracted from the second and differences are highlighted. This approach works well for frame by frame video detecting a ball moving toward the pins and both deadwood and reset pinsetter activities.
To detect presence of a specific pin, individual pin pattern matching was attempted but found to offer poor results. Due to varying distance from the camera the pins were different sizes; back pins were obscured; and reflections often created false positives. The pin tops were tried to eliminate the size, reflection, and obscurity issues, but matching was inconsistent.

Best matches were obtained when a red filter was applied to the pin tops. If the red band was detected within the cropped image top, the pin was standing. Efficiency of both motion detection and pin presence is improved if the image is limited in size. Pin frames and arm frames are “cropped” to improve speed and edge conditions.
Since pins are either up or down, the 10-pin configuration was a value between 0 and 1023 (10 exp 2 = 1024). Pin 1 (index [0]) has an up value of 512, Pin 2 (index [1]) an up value of 256… and Pin 10 (index [9]) an up value of 1. The pin configuration number is simply the sum of the ten values or the binary string ranging from b1111111111 equal to 1023 and b0000000000 = 0.
Initial thinking
There are several triggers that can be used to recognize a changed state. Since it is hoped that the camera can capture at least one frame as the ball moves through the pins and pins often fall seconds after the ball has passed through the pins, a completed pin configuration state must be recognized. A bowler’s deadwood or reset action creates this completion notice, but if reset or deadwood is not needed, the subsequent ball’s presence or timers could create a completed status.
Final concept
The change in pin count is the primary trigger used for changing the state of the led bulbs and for sending data via IoT to blob storage. A 1.5 second delay timer is used to capture the before and after state of the pins.
Early Considerations and Limitations
V2 of the piCamera module has seven default resolution/framerate modes and specific framerates and resolutions can be requested. Early on, I found some sample code for motion detection which used a 1440 x 912 resolution. This resolution seemed to work well in capturing details of the ball, pins, and pinsetter. Unfortunately, the piCamera at this resolution is not capable of reliably recognizing the ball as it approaches the pins.
| No | Resolution | Aspect Ratio | Framerate | Video | Image | FoV | Binning |
|---|---|---|---|---|---|---|---|
| 1 | 1920x1080 | 16:9 | 0.1-30fps | x | Partial | None | |
| 2 | 3280x2464 | 4:3 | 0.1-15fps | x | x | Full | None |
| 3 | 3280x2464 | 4:3 | 0.1-15fps | x | x | Full | None |
| 4 | 1640x1232 | 4:3 | 0.1-40fps | x | Full | 2x2 | |
| 5 | 1640x922 | 16:9 | 0.1-40fps | x | Full | 2x2 | |
| 6 | 1280x720 | 16:9 | 40-90fps | x | Partial | 2x2 | |
| 7 | 640x480 | 4:3 | 40-90fps | x | Partial | 2x2 |
Use of lower resolution, threading, and buffering with post-processing were tried. Also, a laser tripwire was tried to count the number of balls thrown. Several insights were obtained from this exploration.
- I was often able to capture video at the framerates noted above and my code worked well when post processing these frame by frame. When trying to capture movement in real time, the code failed to find movement. It appears that the camera captures the frame, but if the code has not requested the image with a
frame in camera.capture_continuouscommand, the frame is destroyed. - Much of the OpenCV sample code offered in videos or blogs on fast moving objects uses video post processing.
- Placing the IO processing of the video frame in a separate thread did not seem to help real-time processing. It appears that the piCamera buffering feature uses threading. Tools and knowledge on improving OpenCV throughput are ongoing. A 2015 blog by Adrian Rosebrock offers a utility to easily separate the piCamera IO thread.
- Where video was saved in a buffer during processing for pin and ball recognition, the ball was present in at least three to five frames. That same code was unable to reliably capture a single frame with a ball in real time. This reinforces the conclusion that by the time the code finished other calculations in the loop, the frames which contained the ball were no longer present.
- Multithreading did not seem to help in detecting the ball. Multiprocessing, using all four RPI cores did not improve ball capture.
Pseudocode and why
Setup
My initial exploration of Python on an RPI showed the value of functions and the need for configuration settings. Early efforts focused on:
- Camera settings
- Resolution, framerate and field of view relationships
- Rotation
- Brightness
- GPIO pins
- Tell RPI which GPIO pins are active
- Assign duckpin pin value (1-10) to a GPIO pin value
- Crop Ranges to minimize the amount of processing for each image.
- For each resolution - Pin locations - Reset arm and deadwood motion detection locations
- Ball monitoring
- I used Paint and Excel to create crop ranges. Framerate and resolution are linked by the piCamera module. Crop ranges are the pixel locations in format [x1,y1,x2,y2] where x and y are integers. When you change framerate or resolution, the crop ranges will need to reflect the new pixel dimensions. Using an image at the desired resolution, I used the pixel location in Paint and entered it into an Excel spreadsheet that created my Python crop string. A big time saver when you frequently move the camera and want to try different resolutions.
- Imports
- IoT credentials: Keep access credentials out of the repo - Import modules for - time, sys, and IO - Argv – assign defaults and values - Numpy - GPIO - OpenCV - piCamera - IoT functions - Functions that are infrequently used can be imported and not directly listed in the main code. - Helper and debug functions – Writing code for motion detection is often challenging because no two images are the same. The video stream is unpredictable and it’s often unclear what happened during image processing. Viewing the video and/or images processed in real time or saving to file slows processing considerably. The ability to turn these functions off and on is helpful. Also, the camera and video code bases were challenging to keep coordinated. The camera stream and video-file stream use different piCamera and OpenCV functions to process the video images.
Functions that I used often were:
- Capture a number(X) of images at a certain time or frame count(Y)
- Capture a video stream for (X) seconds at a certain time or frame count (Y)
- Show current image being processed
- Full image with crop locations/coordinates
- Cropped image with annotations for xy corners
- Pin Count and lighting leds – Two simple functions
- pinCount
- If red band in cropped pin location exceeds threshold value, sum pin count + (2 exp (9-pin location index))
- LightLeds()
- Convert pin count to a binary string X
- Loop through X and GPIO pin array index[X]
- If 1, turn GPIO to HIGH
- If 0, turn GPIO to LOW
Find Standing Pins - findPins()
- Create arrays of red colors for a red mask. The red bands on the pins vary in color and intensity due to location, age and lighting
- Create a numpy array for the RGB high and low values
- MS Paint worked well to pick the red RGB values from images in the video streams. Other than the red band, there is very little red in the pin image so the range can be very large.

- Create a red mask using the previously described crops and the cv2.inRange function
- Apply the mask to the video stream image using cv2.bitwise_and
- For each pin location, defined by a specific cropped range, measure the color level in the range:
- If red is present:
- Sum pinCount
- Compare sum to prior pinCount
- If changed, record as desired.
Pinsetter Deadwood() and Reset()
A deadwood cycle starts by lifting the standing pins, sweeping an arm to clear the deadwood, and replacing the standing pins. The reset cycle sweeps an arm to clear all pins and then places a new set of 10 pins.
- Deadwood()
- Detect a large green mass moving from the top
- Create arrays of green colors for green mask.
- Create a numpy array for the RGB high and low values
- MS Paint worked well to pick the green RGB values from images in the video streams.
- Create a green mask using the cv2.inRange function
- Apply the mask to the video stream image using cv2.bitwise_and
- Measure the color level in the range:
- If green is present: - Set DeadwoodPresentFlag - Return True
- Else:
- Return False
- Reset()
- Arm movement, prior to the green pinsetter indicates a Reset.
- Detect arm movement in a frame by looking for a green moving object that is not a ball. If arm is present: - Set ResetPresentFlag - Set pinCount to 1023 - Return True
- Else:
- Return False
Send IoT messages
This function can be called on any change in pin configuration. Initially, the function is sending video files of any change to any 10-pin start of a frame. A 2M video file, captures about two seconds of activity. The Python IoT SDK contains samples with helper functions. These helper functions are needed and were refactored and Import-ed.
- Initialize the iot client
- Save captured video to a RAM file
- Format the filename
- Send the message
- Report acceptance and error callback conditions
The Main loop
- Initialize the camera, GPIO pins, counters and values
- Allow camera to warm up
- Create a mask for the ball detection area from a stored image
- Grab a frame from the camera stream
- Crop frame to mask dimensions for ball detection
- Convert mask and next frame to GRAY using cv2.cvtColor
- Detect the difference between the two gray images use cv2.absdiff. This difference is an array not an image
- Use cv2.threshold to convert to black or white image
- Use cv2.medianBlur to reduce noise
- Use cv2.findContours find and locate objects
- For objects found:
- Find the biggest circle present using max(objects, key = cv2.countourArea)
- Use cv2.minEnclosingCircle to determine radius and xy location
- If radius is significant:
- A few alternatives–
- RPI processing:
- Save ball xy data
- Get next frame as quickly as possible. [Other processes can wait while we get as much ball motion as possible.] - Use RPI buffer and send it via IoT to blob storage
- Process video stream off line
- Azure function, VM, or local computer to process video
- Process video stream during low CPU usage (can this be detected or is threasing an option?)
- If no object found:
- Check for a pinsetter Reset and process
- Check for a pinsetter Deadwood and process
- findPins()
Easter Egg
When a strike is thrown, flash the LED bulb and seven-segment counter multiple times.
Post processing
- Get video files from Azure blob storage
- Process the files saving the xy centroid data described above
- Format that data as json and create an Azure table storage entry.
- Send to Azure Table storage
Data Analysis
- Import the Azure table storage to Excel
- Azure Storage Explorer offers a csv export function.
- Excel power query has a feature to put Azure tables directly in Excel
- Using Excel, create a quick template to analyze the relative speed of the ball and the amount of lateral movement as it approaches the pins.
- More data are needed to determine the accuracy of the camera and centroid calculation at various speeds. While the camera pixel is about 1/1300 of 4 feet (about 1mm), it is not a certainty that the centroid calculation offers this accuracy.
In Production
Headless:
In production, the RPI is headless and needs to auto start/boot the python program. There are several ways to do this but after reading Five Ways To Run a Program On Your Raspberry Pi At Startup , I chose to use systemd files. If you use absolute paths to locate your files, the technique works well.
Here’s the startup file that I placed in the /lib/systemd/system folder.
#Startup
[Unit]
Description=My Service to start Duckpins
After=multi-user.target
[Service]
Type=idle
User=pi
ExecStart=/usr/bin/python3 /home/pi/Shared/Duckpin2/DPBoot.py
[Install]
WantedBy=multi-user.target
The commands:
sudo systemctl daemon-reload
sudo systemctl enable sample.service
sudo systemctl start sample.service
sudo systemctl status sample.service
sudo systemctl stop sample.service
and ps aux
provide the tools to debug startup issues. Make sure that you use the command to stop the sample.service before running a python program that uses camera or other resources used by the sample.service.
SD card or RAM disk:
Several blogs referenced a limited life of SD cards that are in a write, read, delete and repeat loop. Extending the life of the SD card shows how to use ram storage for these temporary files.
#!/bin/bash
sudo mkdir -p /ram
sudo mount -t tmpfs -o size=100m tmpfs /ram
Add this line to /etc/fstab. It mounts a folder to RAM, where 777 specifies file permissions
tmpfs /dp/log tmpfs defaults,noatime,nosuid,mode=0777,size=100m 0 0
Logging:
Programs started by systemd do not have a console for printing. Python’s import logging is a fully developed logging system for recording performance information. Logging remains a TODO item. Concerns are the affect of IO operations on the frame capture performance and where to store the logs (SD, RAM, or IoT).
Code Repo: Duckpin2 in GitHub - pull requests accepted
This repo contains all the code that I used while learning Python and understanding video frame processing. The key “production” files are DPBoot.py and its imports and blobtoCount.py. The first is the file that boots via systemd on RPI startup (note the use of imports to keep the code length reasonable and that these file imports must be in the same folder as the DPBoot.py file.)
The second file is the post processing file that I run when blobs are present in Azure Blob Storage. I had hoped to use an Azure function for this processing, but have yet to find the needed OpenCV functions in Azure functions. Also, I’m am not aware of an cheap vm process that I can schedule to run daily. At present, I run it nightly on my desktop.
Challenges
I was unable to get framerates high enough to capture two clear observations of a fast-moving ball. I concluded that ball capture may be best handled as a deferred process. Since repeated overwriting of video files in particular could damage the SD Card, I opted to send the video files from a RAM disk file via IoT to Blob storage for nightly processing. I’d like to use Azure functions for this processing, but I haven’t found a simple OpenCV installation for a function. A VM or old desktop were next.
If the piCamera was moved, calibration of cropped areas was a challenge. Seems like an AI solution could auto correct the position, but it is outside the initial scope.
I expected that JSON stored in blob storage could be easily downloaded and analyzed by PowerBI or Power Query. I didn’t find either to be straight forward.
Results
Except for ball capture and counting, the project worked as expected. Up pins are reliable detected, and pin patterns are quickly displayed. If a pin pattern changes, 2M (about two seconds) of video are sent via IoT to blob storage. Post processing generally produces two to five frames of ball video and centroid calculations are repeatable.
The images below show the contours of the ball detected as it moves toward the pins. The fifth image shows the centroids of multiple balls connected by a line. The video that produced these contours can be viewed by clicking the image below.
The text below is output from the post processing effort this single video. The centroid of the largest contour in each frame is captured as an xy pair. This JSON formatted data is entered in an Azure table.
>Successfully inserted the new entity into table - C:/DownloadsDP/Lane4Free\dp _1023_0_.h264 pindata {'PartitionKey': 'Lane 4', 'RowKey': '20180927643118', 'beginingPinCount': 1023, 'endingPinCount': 0, 'x0': '634', 'y0': '829', 'x1': '637', 'y1': '702', >'x2': '641', 'y2': '596', 'x3': '642', 'y3': '510', 'x4': '576', 'y4': '306'}


Blob storage content can be viewed and downloaded directly in the Azure Portal; Table data cannot. I find that Azure Storage Explorer is the best tool for viewing, editing or downloading bolbs and tables.

Analysis
An Excel spreadsheet of 600+ processed videos can be found at Excel. It is a very simple tool to sort and filter the data for initial understanding of what may be possible with the data. I will provide access to the table data for any interested party.
Future Considerations
Deploying this to eight lanes will challenge my current knowledge of dev-ops. Since the camera will have a slightly different location on each lane, the crop ranges for the pins, ball, arm and setter will vary in each lane. Since I want one code base, I plan to pass an argument at startup to specify the lane. I also want updates to be automated and not require me to push software changes to each lane. Can and should I schedule weekly operating systems updates?
What level of hardware maintenance will be required? The number of IoT devices is increasing very rapidly. I expect that in the very near future, we will be surrounded by hundreds at all times during the day and night. But, I doubt that any will be Duckpin capable and will need extensive customization. There may be interest among a younger student or developer, but hardware and software maintenance is a big consideration if expanded beyond the prototype. UPDATE - After two plus years of operation and the caputure of more than 10,000 rolls, reliability has been remarkably good. I had two jumper wire female-to-male connections fail, likely due to use of low-quality jumpers. LED bubls have also failed gradually (The five LED panels on each bulb fail gradually reducing the emitted light.) Long-lasting LEDs, seems to be a myth.
Resources
Research:
https://gregtinkers.wordpress.com/2016/03/25/car-speed-detector/
https://www.pyimagesearch.com/start-here-learn-computer-vision-opencv/
https://azure.microsoft.com/en-us/blog/how-to-use-azure-functions-with-iot-hub-message-routing/
http://www.nightbluefruit.com/blog/2013/02/how-to-use-git-to-maintain-code-between-2-computers/
Scheduling:
https://www.raspberrypi.org/documentation/linux/usage/cron.md - sudo apt-get install gnome-schedule
Appendix A – RPI Image setup
- RPI Basics
a. Most SDCards purchased with a RPI come with Raspbian installed. Suggest that you update it first using the apt-get command above b. To install Remote Desktop - $ sudo apt-get install xrdp c. To get the RPI ip address - $ ifconfig d. To get RPI ip address when headless. Command prompt from another computer on the local network - ssh pi@raspberrypi.local e. To map a drive for using Remote Desktop Connection i. $ sudo apt-get install samba samba-common-bin ii. edit smb.config per https://www.youtube.com/watch?v=4P5nEH9zGDI - Node
a. The repo contains the version number. As of this date version 9 is the latest node version for Linux. In the final step, make sure that you get the version intended. To download and install a version of Node.js, use the following: i. $ curl -sL https://deb.nodesource.com/setup_9.x | sudo -E bash - ii. $ sudo apt-get install -y nodejs iii. $ node -v - Open CV – a lengthy process
a. sudo apt-get install build-essential git cmake pkg-config b. sudo apt-get install libjpeg-dev libtiff5-dev libjasper-dev libpng12-dev c. sudo apt-get install libavcodec-dev libavformat-dev libswscale-dev libv4l-dev d. sudo apt-get install libxvidcore-dev libx264-dev e. sudo apt-get install libgtk2.0-dev f. sudo apt-get install libatlas-base-dev gfortran g. cd ~ h. git clone https://github.com/Itseez/opencv.git i. cd opencv j. git checkout 3.1.0 k. cd ~ l. git clone https://github.com/Itseez/opencv_contrib.git m. cd opencv_contrib n. git checkout 3.1.0 o. sudo apt-get install python3-dev p. wget https://bootstrap.pypa.io/get-pip.py q. sudo python3 get-pip.py r. pip install numpy s. cd ~/opencv t. mkdir build u. cd build v. cmake -D CMAKE_BUILD_TYPE=RELEASE \ w. -D CMAKE_INSTALL_PREFIX=/usr/local \ x. -D INSTALL_C_EXAMPLES=OFF \ y. -D INSTALL_PYTHON_EXAMPLES=ON \ z. -D OPENCV_EXTRA_MODULES_PATH=~/opencv_contrib/modules \ aa. -D BUILD_EXAMPLES=ON .. bb. make -j4 cc. sudo make install dd. sudo ldconfig - Yarn
a. curl -sS https://dl.yarnpkg.com/debian/pubkey.gpg | sudo apt-key add - b. echo "deb https://dl.yarnpkg.com/debian/ stable main" | sudo tee /etc/apt/sources.list.d/yarn.list c. sudo apt-get update && sudo apt-get install yarn - Azure -IOT
a. git clone https://github.com/Azure-Samples/iot-hub-python-raspberrypi-client-app.git b. cd iot-hub-python-raspberrypi-client-app c. nano config.py i. sudo chmod u+x setup.sh ii. sudo ./setup.sh iii. You can also specify the version you want by running sudo ./setup.sh [--python-version|-p] [2.7|3.4|3.5]. d. If you run script without parameter, the script will automatically detect the version of python installed (Search sequence 2.7->3.4->3.5). Make sure your Python version keeps consistent during building and running. - VSCode on the RPI - optional
```
I’ve tried several tutorials on getting VSCode on a RPI. The following works but it produces an annoying error with every file change or save.
i. Install GPG key
- sudo wget -qO - https://packagecloud.io/headmelted/codebuilds/gpgkey | sudo apt-key add -; ii. Add source repository
- sudo nano /etc/apt/sources.list
- deb https://packagecloud.io/headmelted/codebuilds/raspbian/ jessie main iii. Ctrl-X, Y, enter to exit ‘nano’ and save the updated file. iv. Install VS Code (code-oss)
- sudo apt-get update
- sudo apt-get install code-oss v. Launching VS Code (code-oss) Under the Pi desktop start menu, under Programming, there should now be a “Code - OSS” link. vi. Supporting Links
- Headmelted home page : https://code.headmelted.com
- Package releases : https://packagecloud.io/headmelted/codebuilds
- GPG key from : https://packagecloud.io/headmelted/codebuilds/gpgkey
```
Appendix B - GitHub
- Create a GitHub repo
- Create a folder on one of the local machines
- Git init
- Set remote - git remote add origin https://github.com/cliffeby/Duckpin2.git
- Git pull origin master
- Add files to local folder
- Git add . or git add
- Git push origin master or git push -u origin –all
- Go to parent folder on second local cpu/folder
- Git clone https://github.com/cliffeby/Duckpin2.git
- Go to parent folder on third local cpu/folder a.- Git clone https://github.com/cliffeby/Duckpin2.git
- Make a change to a file on any local cpu/folder
- Git add
- Git commit -m “message”
- Git push origin master
- Use another local cpu/folder
- Git pull origin master
- Make changes
- Git add
- Git commit -m “message”
- Git push origin master
- If local repo is out of synch
- Git checkout –
will delete any local changes to the local instance of the file
- Git checkout –
- Remove a file
- Git rm -r “filename” – Git commit -m “deleted file”
- Git push
Appendix C - Desktop setup for postprocessing
- Use Anaconda to install Python 3 on desktop
- Install openCV - pip install opencv-python
- I use the Windows 10 task scheduler to run every night. This makes sure that blob storage is minimized and the timestamp in the table is the same day as when bowled.
- If you have trouble with the task scheduler, use a .bat file with powershell and you executable string follwed by a pause.
powershell C:/Users/Admin/Anaconda3/python.exe c:/Users/Admin/OneDrive/pyProjects/Duckpin2/blobtoCount.py pause - In my case, numpy needed to be updated. Then I received the error “Can’t connect to HTTPS URL because the SSL.” Changing my Path corrected the problem. Interestingly, the script didn’t fail when run directly in VSCode.
<path>\Anaconda3
<path>\Anaconda3\scripts
<path>\Anaconda3\Library\bin
Appendix D - Pinsetters
Click on images for video.
Sherman Duckpin Pinsetter at Congressional Country Club

A video on YouTube of the Sherman Pinsetter.
I was fortunate to get a backroom tour of the Candlepin Pinsetters at North Star Pizza in Wilmington, VT. Owner Steve Butler told us about the rebuild to solid state after a flood ruined the lanes and relays. Quite different than a duckpin setup.
